Whether you’re going for an au naturel look or want to make a daring bold statement, Seventeen.com have complied easy makeup looks that every girl should learn to master. From the perfect winged eyeliner, a flawless foundation to bold brows or the lit from within glow, these are easy makeup looks that are definitely worth learning. Check out the step-by-step guide and become a makeup pro.
Reader Poll
Thanks for sharing your thoughts.
Want more like this? Subscribe for personalized picks.
Successfully subscribed.
Check your inbox for personalized content.
#1
1 Apply illuminating moisturizer to your entire face. We like Tarte Amazonian Clay BB Illuminating Moisturizer, which will give you a hint of color while making your skin glow, thanks to skin brightening ingredients like vitamins A, C, and E.
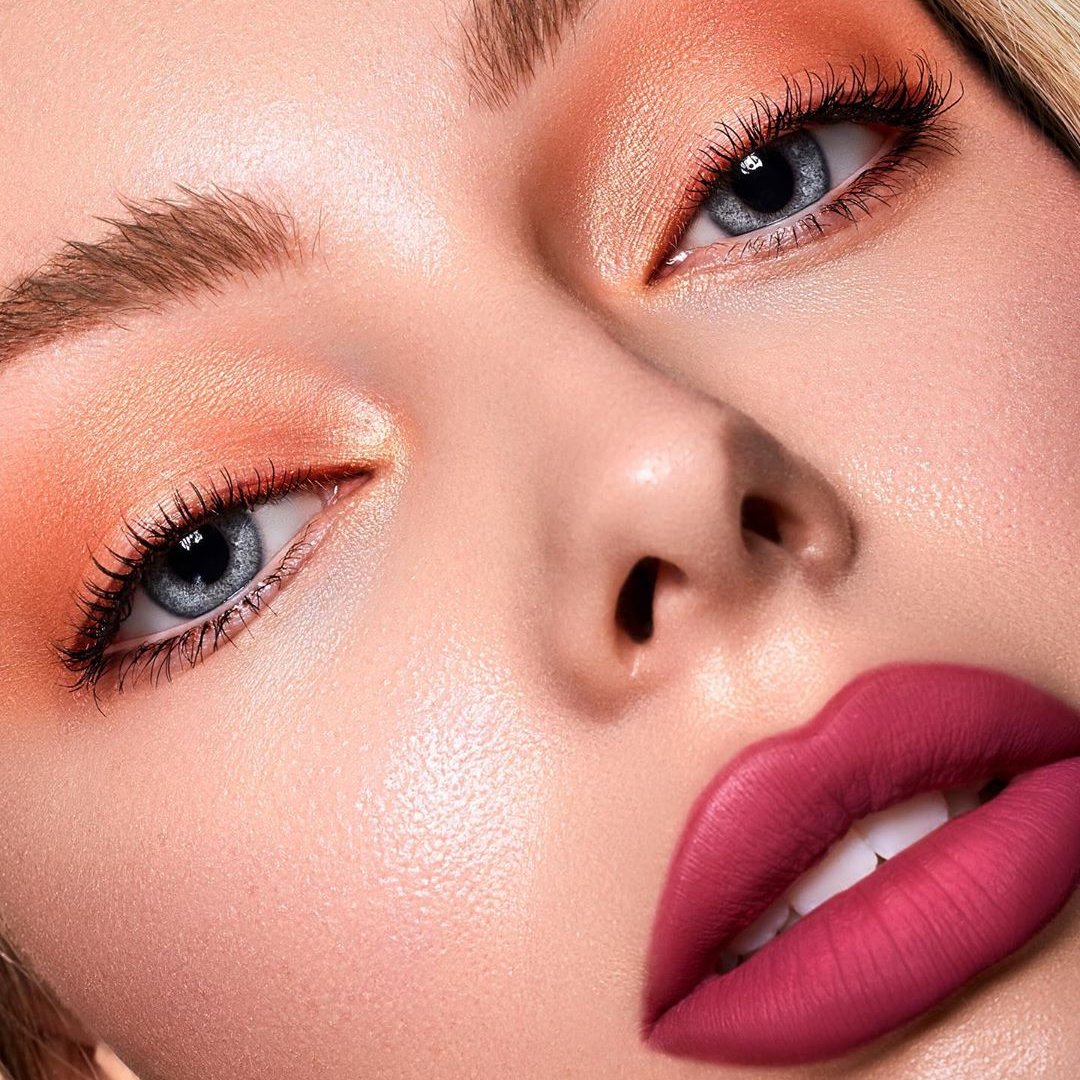
2. Add shimmer eyeshadow to the insides of your eyes. Getting a gorge glow means not just focusing on your skin! Applying white or silver shadow to the insides of your eyes will brighten up your entire face, making your peepers look wide open. The shimmer shadow reflects light, making you look like you slept a full eight hours.
3. Lightly apply bronzer to your entire face. Using a brush made for loose powder (such as Eco Tools Bamboo Bronzer Brush), apply bronzer one shade darker than your skin to your entire face. Lay it on a slightly heavier where the sun would hit naturally: on the apples of your cheeks, forehead, and chin.
4. Swipe highlighter down the bridge of your nose. This finishing touch adds even more shimmer and helps make your cheeks pop.
#2
1 Prep your skin with primer. This creates a smooth, even canvas for your makeup to ensure it stays put all day. We love E.L.F. Poreless Face Primer for its matte finish.
2. Apply foundation. Using your fingers, apply a full-coverage foundation to your entire face, always blending up and away from your face instead of towards the center. (Find out how to pick the perfect shade for you here.)
3. Using a small brush, apply concealer under your eyes. Pick a shade that's one shade lighter than the rest of your face, blending it into your foundation so there's no harsh line differentiating the two.
4. Finish with sheer powder. Setting powder is super-important because it keeps your makeup from sweating off or settling into dry patches or on acne.
#3
1 Apply your face makeup first. Create smooth, even skin with your fave BB cream or foundation.
2. Measure where you're going to fill in your brows. The front of your eyebrow should line up closely to the inner corner of your eye on the same side. The end of your brow should form a diagonal line down to the other corner of your eye, and the arch should cut through the middle of your eye.
3. Brush your brows upward with a small eyebrow brush. This will allow you to see sparse areas easily. The end of most eyebrow pencils has a perfect brush, or you can ask Sephora for a few disposable ones (aka spoolies, they look like clean mascara wands).
4. Fill in sparse areas with an eyebrow pencil. Use small sideways strokes that mimic hair. Start lightly - you can always add more, but it's much harder to start all over! When you're done, brush your brows again (up at the inside of your eye and then out) to smooth them into place.
#4
1 Apply all of your eye makeup, except mascara. It's very important that you wait to apply mascara until after you use an eye curler in step 2. You don't want to be like Miley Cyrus and pull out a chunk of your lashes!
2. Curl your lashes with an eyelash curler. Curled lashes make your eyes look even bigger and flirtier! We like Tweezerman ProMaster Lash Curler because it has a wide-set opening, perfect for almond and deep-set eyes.
3. Swipe on eyelash primer. The fibers give your mascara more to adhere to, thickening your lashes temporarily. If you don't have primer available, you can also use pieces of cotton balls.
4. Apply volumizing mascara. Roll the mascara wand upward through your eyelashes, repeating until you've coated them a few times. Wiggle the wand downward on your lower set to get those tiny lashes.
"Enhancing your beauty doesn't always mean going for the glossy look. More ladies now see the allure of a shine-free finish. With the right tools and techniques, you can also achieve a flawless, subtle glow. Learn how to master this trend by following these incredible matte makeup tutorials. Enhance your natural complexion without the unnecessary flash."
#5
1 Apply primer to your lips. Just like face primer, a lip base will keep your lipstick from smudging. You can apply a little cream primer to a tissue, makeup sponge, or your finger, or use a lip primer pencil, like Nyx Cosmetics Lip Primer.
2. Line your lips with a lip pencil. Lip liner is important with bold colors because it keeps your lipstick from bleeding or smearing outside your lips. It's less necessary when you're rocking a nude or pale pink shade, but reds will look messy quickly without liner to keep it in check. Make sure the shade you use is close to the color of the lipstick you choose so there's no noticeable line.
3. Color in your lips with the lip pencil. Your natural lips aren't one even shade, so coloring in your lips with liner creates an even color - a perfect canvas for lipstick.
4. Apply red lipstick. Make sure you go all around your lips, remembering the inside corners.
***
Blot and set your red lip. After applying, take a thin tissue and press it lightly over your lips. Then, with a fluffy brush, gently dab some translucent powder over the tissue on your lips. This step helps to set the lipstick, minimize smudging, and extend its wear time. For an extra pop, you can apply a second coat of lipstick after blotting for a vivid and long-lasting look. Remember to ensure that your lipstick is fully dry before adding more layers to avoid caking.
#6
1 Start with clean, dry skin. If you feel comfortable, skip foundation for this look to allow your natural flush to come through. If you feel better with a little coverage, apply foundation first, before the blush.
2. Map out your face. Find the apples of your cheeks and your brow bones. This is where you're going to focus the blush to get the most natural look.
3. Apply shimmer blush. With a loose-powder brush, apply a shimmery powder above the apples of your cheeks up towards your brow bones. We used Bobbi Brown Shimmer Blush in Pink Sugar, which will reflect light and open your eyes.
4. Add pink blush. Smile (!) and apply a pop-of-color blush right to the apples of your cheeks. That's the brightest spot on your face naturally. Find out how to find your perfect blush shade here.
#7
1 Start with a clean, moisturized face. If you like to wear tinted moisturizer or foundation, apply it now before you add bronzer.
2. Apply bronzer to your cheeks and forehead. Use your fingers to swipe bronzer above both your eyes close to your hairline, and on your cheeks from the top of your ear down towards the corner of your mouth. Use a powder or cream bronzer no more than two shades darker than your skin tone.
3. Blend the bronzer. Using a loose-powder brush, blend the bronzer in upward strokes towards your hairline.
4. Apply finishing powder. Keep the contour from smudging with a sheer setting powder.
#8
1 Prime your eyelids. Eyelid primer will keep your shadow from settling into the crease of your lids. BareMinerals Prime Time Eyelid Primer is super lightweight so your lids won't look greasy.
2. Apply the lightest eyeshadow color to your eyelid crease and brow bone. Use shimmer shadow to make your eyes look wide open. Milani Brow & Eye Highlighter Pencil is the perfect beige shade with light diffusing pigments.
3. Add your crease color. With a small shadow brush, apply a medium brown shadow into the crease of your lids. This will intensify the final product and make your smoky eye look super glam.
4. Apply darkest shadow shade. Sweep a dark gray eyeshadow onto your lids and lightly blend upward toward your crease and brow bone. Gray is both bold and easy to wear, since it looks amazing with all eye colors.
5. Line your lower lids with pencil. A gunmetal gray eyeliner is equal parts pretty and edgy - if you want something a little more dramatic, go for black.
6. Apply a few coats of mascara. Black mascara is super glam and bold, perfect for this look!
***
Starting with primed eyelids sets a vital base for your makeup and wards off any creasing that might occur throughout the day. A quality eyelid primer such as the BareMinerals Prime Time Eyelid Primer will keep the skin looking matte and ensure that the eyeshadow applied stays vibrant and locked in place. Following with a light, shimmery shadow, like the one provided by the Milani Brow & Eye Highlighter Pencil, not only brightens the eye area but also accents the brow bone for a lifted look. Subsequently, defining the crease with a medium brown shadow adds depth and a hint of drama necessary for a glamorous smoky eye. The transition to a dark gray shadow on the lid forms the classic smoky base that's versatile enough for all eye colors. Pairing this with a gunmetal gray eyeliner gives a softer yet compelling edge that's effortlessly chic. Lastly, topping off the look with several coats of black mascara can dramatically enhance the lashes, providing that final touch of glamour that ties together a sophisticated and bold eye makeup look.
#9
1 Apply a base eyeshadow. A shimmery gray is really pretty, and keeps the glitter (coming in step 3!) from looking over the top.
3. Dab on sparkly eyeshadow. Using your fingers, apply the most important product - glitter! This will take your look to the next level. Use a glitter shadow like OCC Glitter Eyeshadow all over your lids, concentrating the most product into the creases.
4. Apply mascara. Black volumizing mascara is perfect for this look.
#10
1 Start with clean skin. You want to apply your eye makeup before your face makeup. This way, if you need to clean up any loose powder or smeared eyeliner under your eyes, you won't have to reapply your foundation.
2. Dot on eyelid primer. If you're going to rock a flawless winged liner, you want it to stay all day. Eyelid primer will keep it from smudging.
3. Create the wing. With black cream eyeliner on a skinny brush, pretend you're drawing on your lash line and then continue it out towards your temple for the perfectly shaped wing. It's totally up to you how far out you want your wing to go. The longer the line, the more dramatic the cat eye. If you're struggling with getting a straight line, try using scotch tape or another edge like a playing card. (You can also try this crazy eyeliner created especially for cat eyes!)
4. Connect the wing. Create a triangle shape from the end of your original line to middle of your eyelid. This will be the shell of your cat eye.
5. Fill in the triangle. Use a black pencil to color in your wing. It looks fancy, but it's basically just coloring in the lines.
6. Apply eyeliner to your waterline. This will create more drama, and make your lashes look full and thick.
Reader Poll
Thanks for sharing your thoughts.
Want more like this? Subscribe for personalized picks.
Successfully subscribed.
Check your inbox for personalized content.
Feedback Junction
Where Thoughts and Opinions Converge
Add allwomenstalk.com as a preferred source on Google to see more of our trusted coverage when you search.
Don't Miss the Latest Version
Get the latest stories, save favorites, and share with friends — all in one place.
/filters:quality(70)/content/ju/bs/gupm4fnv5938291a5ade8069299584_600x1814.jpg)
/filters:quality(70)/content/zo/ur/k7x9fo2t5938291ae0997024850400_600x1815.jpg)
/filters:quality(70)/content/by/g4/we18wb695938291b13408628987694_600x1814.jpg)
/filters:quality(70)/content/ax/o2/ndu8k8ky5938291b371f0312093713_600x1814.jpg)
/filters:quality(70)/content/y7/xd/r5u7gse65938291bc1d84433562111_600x1814.jpg)
/filters:quality(70)/content/oi/ca/u0wsx2t95938291b7fd61171266598_600x1814.jpg)
/filters:quality(70)/content/qu/dw/ni682wtk5938291edaff8085208415_600x1814.jpg)
/filters:quality(70)/content/jw/o9/xoo75nj75938291f8a941425334353_600x2278.jpg)
/filters:quality(70)/content/w1/g9/plg8qdib5938291f98640198151033_600x1815.jpg)
/filters:quality(70)/content/ob/wz/reqmy7w25938291fc2144098455551_600x2278.jpg)


Feedback Junction
Where Thoughts and Opinions Converge